Showing posts with label walkaway dress. Show all posts

Saturday, 24 April 2010

Walkaway dress: Complete!

Dear and constant reader, it is complete! I had to make one final adjustment to the front hem which was a few inches longer than the back despite us measuring from the floor upwards when we set it so it should have been identical. Ah well. You will notice that the front sits a bit different to the pattern envelope. This is due to the dress having ties that cross over at the front and wrap all the way round. At a later date I may make a slit for one tie to go through the other to make it neater. However it will certainly do for now. So onto the particulars.

Here is the front view. I appear to be stood on a slant. Just ignore that, it's been a long day :o)


Side view. No silly gaping bits now.


Back view. Again please ignore the slant. As you can see there is a massive bow which the original dress doesn't have. I like it. Spadger is learning how to do a butterfly bow to make it even more pretty!


Gratuitous armpit shot. Notice no bra on show. Quite proud of that one.


Lastly here is a new thing I learnt today thanks to this tutorial. Bound buttonholes. The back doesn't meet at all due to not having enough material so we put strap over the back to this button. I've never done a bound buttonhole before but I found it quite easy. Lots more buttonholes to come me thinks :o)


So there you have it. One Walkaway dress. Yeah I had to make a ton of alterations to it. Yeah it is darn pretty! I know a lot of people are a bit nervous about tackling this one but I say go for it. Just don't expect to get the first one done in a hurry and you''ll be fine. Treat it as a Zen exercise and all will be fine.

Wednesday, 21 April 2010

Walkaway dress alterations: Post 3 - Starting to put it together

Well this is it. We are cutting out the pieces for the Walkaway dress. I say we because Spadger is cutting I'm just helping. He is much steadier of hand and I was terrified of cutting it wrong. How awesome is he?!?!?! I will hopefully get all the pieces together tonight and then it needs to hang to let the bias set on the skirt. In my delight at getting it done I'd forgotten that bit and am now a tad disappointed that I can't finish it tonight. Ah well. This means Friday night will be spent hemming and binding and then it should be done.

It's now 11:32 and I want to go to bed. But first a quick sneak peek at the dress. It's not finished (see above) but it's all sewn together. Please excuse the other dress underneath but I needed something to pin it to!


The ties I mentioned in the last post will pull this in a little more under my bust.


Look no silly gaping! (ignore the selvedge edge. Yes I know I shouldn't have cut into that but I really liked it and wanted it to be in the dress even if it will be hidden in the seam)


Nice lower neckline and no cap sleeves.


Will definitely cover my bra!


So there you have it. I will post completed pics either Friday or Saturday depending on when I get it finished along with a run down on how to alter it for yourself. Sweet dreams dear readers :o)

Tuesday, 20 April 2010

Walkaway dress alterations: Post 2 - The Frankenstein dress

Hey folks. It's another exciting installment of the Walkaway dress saga. Today I introduce you to Frankenstein dress. To make all those alterations I discussed before I have added several pieces of fabric to the original pattern to make room for the alterations. I could have started from scratch but that would be awful wasteful. So I merrily began tacking extra bits on. I took in the shoulder, lowered the neckline, extended and raised the front and back armholes.

Now this first picture is still not the most flattering of things. It just doesn't pull in at my waist quite like I want. I could alter the darts but Spadger had a cunning idea involving long ties attached to where the closures should go so I can wrap it around me several times like an Obi belt and tie it where ever I feel like that day. This will allow me to cinch it in a bit more.


Now lets ignore the fact that I have the middle pinned very badly and admire my bust instead. The dart that is. What a difference it has made. No more weird bagging. Also no odd little cap sleeves (apologies if you like cap sleeves, they've never really done a lot for me. I'm broad enough in the shoulder thank you without drawing extra attention to it!) Plus a slightly lower neckline. Now I know it's not much but I think it sits in a much better place on me.


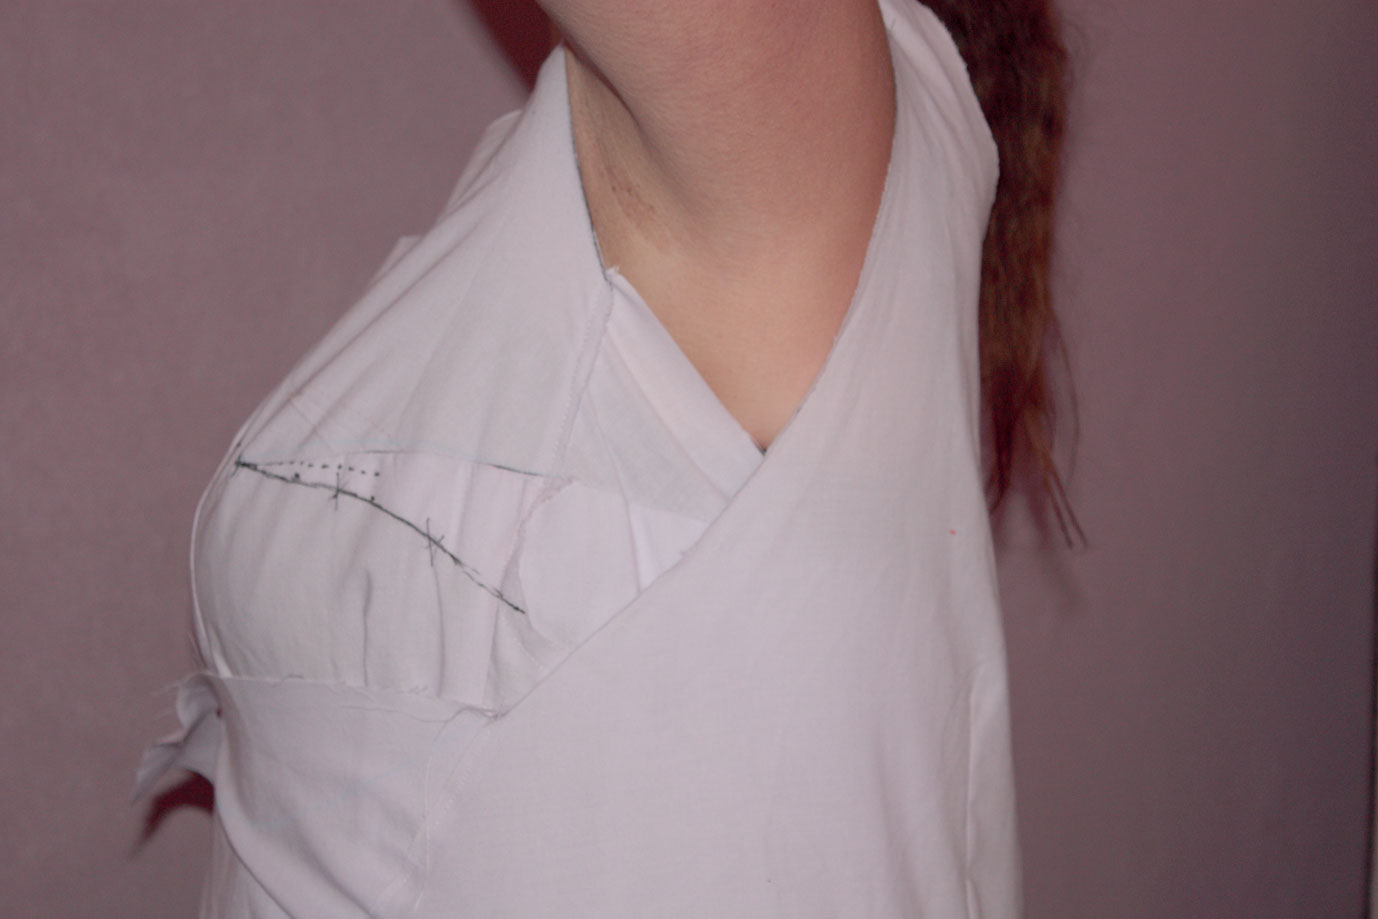
Lastly another gratuitous armpit shot. If you look real close you can just see the edge of my bra. Just. Much better than the gaping hole we had before.


All in all a success I think. What I will do now is pick this apart, cut the darts out so I can draw them in directly and cut the "good" half of the front piece off. These will then form my pattern pieces. The only other alteration I would like to make is to extend the front pieces so they actually meet at the back. At the moment I would have to use a tie to close it up which I think might me more visible now it's higher. However this will depend on how much material I have to work with.

Monday, 19 April 2010

Walkaway dress alterations: Post 1

Hey folks. Here is my first post on the evolution of the Walkaway dress.

The first thing I did after I had cut out the pattern for thsi dress was do an FBA. This is standard practice for me now as I am a J cup so there is usually a lot of extra room needed since patterns are based around a B cup. Turns out I didn't need to do that at all. This pattern is quite roomy in the bust area so the 16 actually fits. Sort of. I say sort of because it doesn't really. Here, let me show you.

Now be gentle guys, these are some of the least flattering pictures of me I have ever shown anyone. This is exhibit A. (Please ignore the socks and the mismatched ribbon that is holding the dress together) Note the bagginess at the sides above the darts. The slightly gapey waist area and the weird over hang at the shoulder.


Exhibit B. Odd line under bust I think and masses of bra on show.


Exhibit C, gratuitous armpit shot. from the pictures on the pattern envelope the front should come round high enough to cover the bra and the back should come round quite high and go just over the side of your boob and close at the front.


So far we're not doing very well. But his is what I mean about it fitting kind of. there is clearly no need for me to do an FBA. This just leads to having masses of material to try and take up in darts at the side. Pus that wont actually give me more material where I need it. So this is where Spadger comes in armed with a pin cushion and a Sharpie.

The first things we did was undo the side dart and redraw it. Click on the pic to make it bigger. Can you see the line of the original dart just above the dotted line? Now I know french darts point upwards but I'm fairly sure that's not what these ones are. The new dart is in line with my bust apex without coming right to it and takes up all the slack on the side. Much better.


The rest of the alterations are marked here with arrows. I am bringing the shoulder in on the outside. I like the wide neckline but these little over hang bits will drive me nuts. There is the new bust dart that I showed you above. I plan of lowering the neckline to the low point of that central line. The bottom arrow is pointing to where I plan on having the back pieces come to. Now it won't come over my bust like it is supposed to because there is no way it would lay nicely there. To much out front you know? So I'm going to bring it under my bust like an empire line almost.


Like this.


Lastly I need to add a bit to the waist length. Those 50's lasses were a lot more waspy than me!. So those are the planned alterations. Not many hehehe. I might also pull the waist darts in a little more but I think that will depend on how it lies under the higher back pieces. Hopefully by bringing the front pieces up I will eliminate the problem I've read about with the dress slipping due to the weight of the back piece. Because the front pieces fastened so low at the waist in back there is nothing to help cinch it in. I'll be closing it much higher up (and have a bit out front to anchor it down over as well) which I am hoping will stop that problem entirely.

Tuesday, 13 April 2010

The walkaway dress


I am in the middle of tackling the walkaway dress Butterick 4790. This is what they call a repro of a 1952 pattern which means it has been scaled up for modern pattern sizes. I bought the pattern, fabric and enough (hopefully) bias to make it with my birthday money and have been looking at it since. Mostly because every review I have looked at shows people really struggling to make it. Should have really looked it up first. But I decided to tackle it anyway.

The first mistake I made was going straight into doing an FBA like I usually do without measuring the pattern. Oops. Seems like this one doesn't need it. So I might not have a tiny 1950's waist but I rock their bodacious chests! I cut a straight size 16 out which is right for my high bust measurement and it seems pretty good. As you can see it's not perfect by any stretch. It doesn't cover my bra under the arms. I think this may be because I am pulling the sides down to connect at the front so it goes under my bust. The girls would make it lay rather funny if I just pulled it around I think. To fix this I'm going to undo the side darts and redraw the line so it is higher. I might need to add another dart or take more up in the existing one depending on how it lays with the extra at the side. For the muslin I'm just going to sew some extra material on to do this. I don't like the wide shoulders so I'm going to narrow those and I think I'll drop the neckline a bit as it's not doing me any favours. Currently the back doesn't come all the way round to the middle front like it is supposed to (darn wasp waisted 50's). I was originally going to do some kind of lace up front but I get the feeling that the material will bunch in an unflattering way. So I'm gong to extend the pattern pieces.

Once I have it all as I would like I'm going to unpick it and use it as the pattern. I used to be of the thought that I should strive for a wearable muslin but I don't think that is viable with this. Because of where all the darts are and how hard they are to copy the plan is to actually cut them out of the pattern so I can draw round them on the fabric below. I used to feel that altering the patterns a lot was a bad thing. If I had a pattern I should follow it. However I used to feel that was about cooking recipes until I made pumpkin muffins using a banana muffin recipe. Damn they were tasty. But back tot he sewing. What is more important, the dress looking like the pattern or the dress looking good on me? Clearly the latter wins.

I will keep you posted on the progress and hopefully I will be showing a beautiful walkaway dress soon.